
Fancy Ribbon Straight Pins


 I use straight pins for more than just sewing and they seem to disappear rather quickly. It is wonderful that they come in a large variety of colors...
and designs.
But I just can't seem to get myself to spend $4.00 on a package of them. So I decided to make my own Fancy Ribbon straight pins. 
I started with just a few pins and some leftover ribbon..
Then I sewed a little square,leaving one side open.
 Then I inserted a pin just before I closed up the square.
 Lastly I cut and trimmed the ribbon on both sides.
  Fancy Ribbon Straight pin was done! They are fairly addictive to make and made several in a just few minutes.
They come in handy not only for sewing but for securing my jewelry during photo shoots..
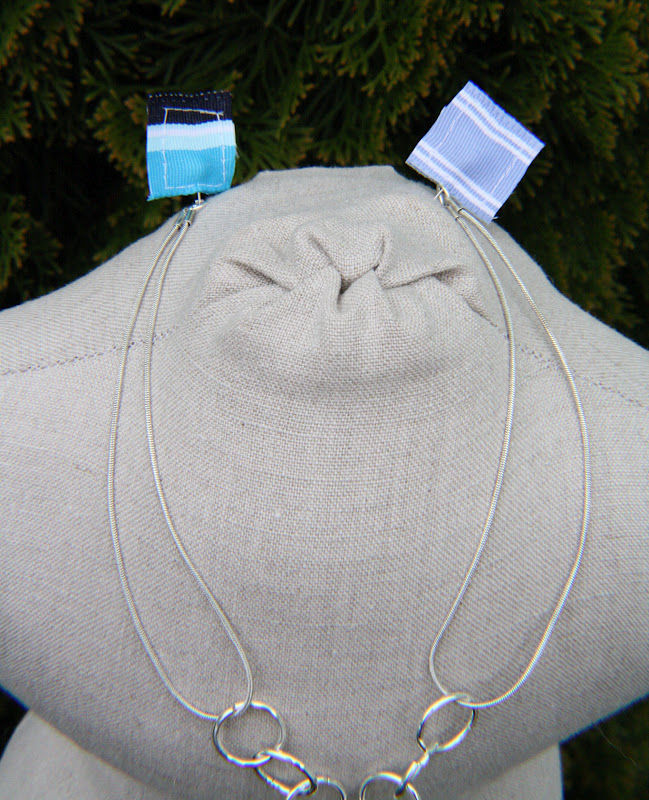
and easy to see when you drop them in the lawn!
Enjoy!

Comments

  1. Janet, I love these little pins! So much so, I featured them as part of my link party wrap up!

    ReplyDelete
  2. This is such a sweet little project and very creative. You could sell these.

    ReplyDelete
  3. This is such a cute idea! I would love for you to share this post with my readers at my linky party via: http://ourdelightfulhome.blogspot.com/2012/04/show-me-what-you-got-linky-party-9.html

    PS: I am your newest Linky Follower!

    Mrs.Delightful
    www.ourdelightfulhome.blogspot.com

    ReplyDelete
  4. Colorful and fun! Love it! Thanks so much for sharing these cuties at The Mother Lode linky party over at I Gotta Create!
    <3 Christina
    http://igottacreate.blogspot.com

    ReplyDelete
  5. This is such a cute idea and a great way to use up ribbon scraps!

    ReplyDelete

  6. Hello! I’m stopping in to invite you to join us at the Clever Chicks Blog Hop
    this week!

    http://www.the-chicken-chick.com/2012/11/clever-chicks-blog-hop-7-country-craft.html

    I hope to see you there!
    Cheers!
    Kathy
    The Chicken Chick

    ReplyDelete
  7. thanks for sharing such lovely info and experience ! even you experimented ribbons in lawn ! sight testing ! cute

    AUSTIN TRIM & WHOLESALER

    ReplyDelete

Post a Comment

Popular posts from this blog

Ipad Pillow Stand

I like to watch tutorials on my Ipad and although I have a cover that converts to a stand, it isn't always the best solution for viewing. So I decided to make one of my own inspired by these Iphone stands I found on Etsy. They are sold by dognamedbanjo  and are really unique and lovely. So I thought I could make one similar to it and here is how i did it. First I started with a 1 yard of a fabric in my two favorite colors. Then I cut the following pieces 1 Pc 13" x 13" 1 pc 29 x 13" 2 Triangle pieces 13" x 13" x 13" Next I sewed the top square to the two triangles. This is will be the sides and the base. Next I took the large rectangular piece and sewed it to the bottom of the square. Now I don't have photos of the last few steps since once it start forming a pillow it is difficult to photograph, but the process is not that difficult. Next I sewed each side of the the rectangle to one side of the triangle on both s

Neck Tie Upcycled to Cuff

I found a large stash of Neck ties at an Estate Sale this past weekend and I had to buy them since I had the perfect idea for an upcycle project. They were mostly from a long since closed store here in Buffalo,NY and I felt the need to preserve them as well as the tags. I started by washing them on gentle and removing them immediately and laying flat to dry. They came out a little disfigured but nothing that a little ironing wouldn't fix. Next I took a seam ripper and opened up the back to take out the interfacing. I did this for two reasons, it was discolored and had a little odor and it would be easier to sew without this bulk.  I next cut the tie into a piece 10" long and hemmed the edge. Then I sewed two pieces of velcro to each side to make my cuff. The last step was to sew on a few antique buttons and beads and my cuff was done. Wow! Looking at this I can't believe how it turned out!.But wait... I made a few more! Love this one.. Antique Maple leave button and golden

Ultra Mini Dress Form

My obsession with mannequins continued this week when I remembered a free pattern for a tiny dress form pin cushion that I saw back in January.  It's a two page download at www.thediydish.com  with a video that takes you thru step by step of the process. I wanted to make a few of these for my craft room but thought they would also look lovely adorned with my recycled jewelry. So I started by selecting a few fabrics in colors that I love. Blues and greens are my favorite and make me feel like spring is not far away. After cutting and sewing the simple patterns and easy instructions (via video), I had these three stunning ladies in my craft room. They require very little fabric and can be mounted on candle sticks or spools. I made the long green dress form about 4" longer than the pattern since I wanted a bit of height and enough space to hang pedants. I added glass drawer knobs and beads for the neck inserts. I then added a few necklaces. I chose just a